🫁 Lung Cancer Detection: CNN → Hugging Face Space → React UI → CI/CD
Published:
Lung cancer is one of the leading causes of cancer-related mortality worldwide. Early and accurate diagnosis plays a critical role in treatment planning and patient outcomes. Among the different diagnostic modalities, histopathological analysis of lung tissue remains a gold standard for confirming cancer type and subtype.
From a clinical perspective, lung cancer is commonly categorized into multiple histological subtypes. In this project, the focus is on three clinically relevant categories:
- Normal lung tissue (
lung_n) - Lung adenocarcinoma (
lung_aca) - Lung squamous cell carcinoma (
lung_scc)
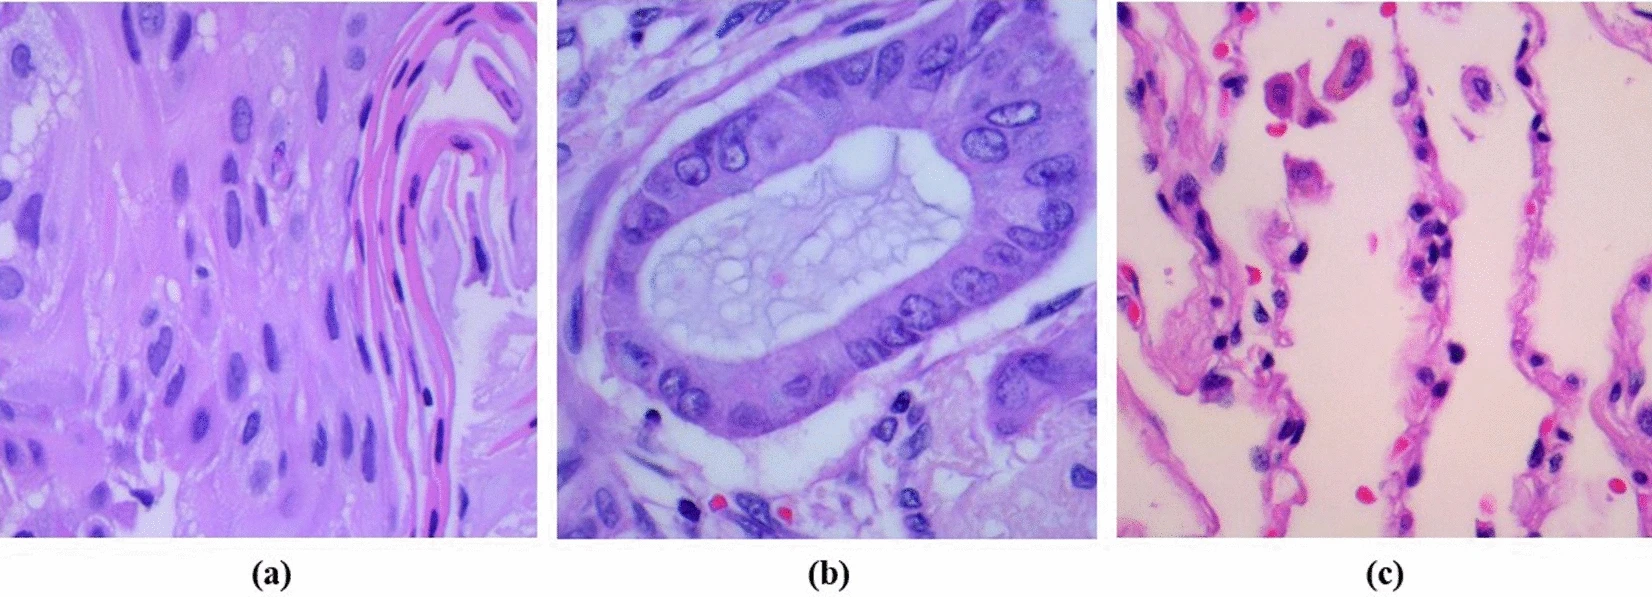
(a) representing lung adenocarcinoma,
(b) showing lung squamous cell carcinoma,
(c) depicting normal cells.
Adenocarcinoma and squamous cell carcinoma are two major forms of non-small cell lung cancer (NSCLC), each associated with different growth patterns, treatment strategies, and prognostic implications. Distinguishing between these subtypes using histopathology images requires careful analysis of cellular morphology, tissue architecture, and staining patterns, which can be subtle and highly variable.
Why Convolutional Neural Networks (CNNs)?
Histopathology images are high-dimensional and spatially complex. Traditional machine learning approaches require handcrafted features, which often fail to generalize across staining variations and tissue heterogeneity.
Convolutional Neural Networks (CNNs) are well-suited for this task because they:
- Learn hierarchical visual features directly from raw images
- Capture local textures (e.g., nuclei shape, gland structure) and global morphology
- Are robust to small spatial variations through pooling operations
Early convolutional layers typically learn low-level patterns such as edges and color gradients, while deeper layers capture higher-level morphological features that differentiate cancer subtypes.
Problem formulation
From a machine learning perspective, this task is formulated as a multi-class image classification problem:
- Input: RGB histopathology image of lung tissue
- Output: One of three class labels (
lung_n,lung_aca,lung_scc) with associated probabilities
Performance evaluation goes beyond overall accuracy. In medical settings, class-wise recall (sensitivity) and false negative rate (FNR) are particularly important, as missed cancer cases can have serious clinical consequences.
Motivation for an end-to-end system
Many academic projects stop at model training and offline evaluation. However, deploying a trained medical imaging model introduces additional challenges:
- Large model artifacts (often >100 MB)
- Reproducible inference environments
- Safe and consistent preprocessing
- Practical access through APIs or user interfaces
The goal of this project is not only to train a CNN, but to build a complete, reproducible, end-to-end system that takes a histopathology image as input and produces a clinically interpretable prediction through a live web interface.
The sections that follow document this process step by step—from dataset preparation and model training to deployment, containerization, and frontend integration—so the same workflow can be reused for similar medical imaging applications.
System overview
The system consists of the following components:
- A CNN-based image classifier trained with TensorFlow/Keras
- Saved model artifacts (>100 MB)
- A FastAPI inference service
- A Gradio-based Hugging Face Space for free model hosting
- A React frontend built with Vite and Tailwind CSS
- Docker for reproducible backend deployment
- GitHub Actions for automated builds and deployment
High-level architecture
The final setup supports two inference paths:
Hugging Face Space inference
- The trained model is hosted on the Hugging Face Hub
- A Gradio app loads the model and exposes a prediction function
- The frontend sends images directly to the Space
FastAPI inference
- A REST API loads the same trained model
- Exposes
/predictand/healthendpoints - Can be run locally or inside Docker
This dual approach allows:
- free public inference without hosting a server
- a clean API implementation for local testing and containerization
1) Starting point: define the goal and freeze the dataset layout
I began with one clear objective: classify lung histopathology images into 3 classes:
lung_n(normal)lung_aca(adenocarcinoma)lung_scc(squamous cell carcinoma)
The first practical step was ensuring a stable dataset layout that my training and inference code could rely on:
data/raw/lung_colon_image_set/lung_image_sets/
  lung_aca/
  lung_n/
  lung_scc/
This folder naming is important because later:
- training maps folders → class indices
- inference uses
classes.jsonto map indices → labels
Kaggle Dataset Link: Lung and Colon Cancer Histopathological Images
Typical setup commands:
mkdir -p data/raw
unzip lung_colon_image_set.zip -d data/raw/lung_colon_image_set
2) Phase 1 — Train the CNN model (only ML first)
I trained the CNN using the scripts under src/lung_cancer/:
dataset.py(load + preprocess)model.py(CNN architecture)train.py(training loop)evaluate.py(classification report)
Run training (from repo root):
python -m src.lung_cancer.train
Run evaluation:
python -m src.lung_cancer.evaluate
The training output is versioned under:
artifacts/models/v1/
  lung_cnn.keras
  classes.json
  metadata.json
artifacts/reports/
  classification_report.txt
This artifact layout is what the FastAPI backend loads later.
3) Phase 2 — Test the trained model through FastAPI
Before building a UI, I validated inference through an API.
Your backend is in backend/ and exposes:
GET /healthPOST /predict(multipart image upload)
It loads model artifacts at startup using ensure_model_files() and creates LungCancerPredictor.
Run FastAPI locally
pip install -r backend/requirements-backend.txt
uvicorn backend.main:app --host 0.0.0.0 --port 8000
Health check:
curl http://localhost:8000/health
Predict using an image:
curl -X POST "http://localhost:8000/predict" \
  -F "file=@data/sample_requests/example.png"
At this point, I had an end-to-end system working locally: image → API → model → JSON response.
4) Phase 3 — Dockerize the backend
Next, I containerized the backend using the repo Dockerfile.
Key details:
- CPU-only inference is enforced via
CUDA_VISIBLE_DEVICES=-1 - backend dependencies come from
backend/requirements-backend.txt - code is copied from
src/andbackend/ - Uvicorn is the container entrypoint
Build and run locally
docker build -t lung-cancer-api .
docker run --rm -p 8000:8000 lung-cancer-api
Test:
curl http://localhost:8000/health
5) Phase 4 — Push the Docker image to Docker Hub (pull-and-run workflow)
Once Docker worked locally, I published it so anyone can run:
Login
docker login
Tag the image
docker tag lung-cancer-api:latest mdislammazharul/lung-cancer-api:latest
Push
docker push mdislammazharul/lung-cancer-api:latest
Anyone can now pull and run it
docker pull mdislammazharul/lung-cancer-api:latest

docker run --rm -p 8000:8000 \
  -e ALLOWED_ORIGINS="*" \
  mdislammazharul/lung-cancer-api:latest
This gives a clean “one command to run inference locally” workflow.
6) Phase 5 — Handle the >100MB model file
After training, the model was >100MB, which created problems when I tried to push it normally to GitHub.
So I used two strategies (both useful depending on the situation):
Option A: GitHub with Git LFS
One-time setup:
git lfs install
Track model files:
git lfs track "*.h5"
git lfs track "*.keras"
Commit + push:
git add .gitattributes
git add artifacts/models/v1/lung_cnn.keras
git commit -m "Track model with Git LFS"
git push origin main
Option B: Hugging Face Hub (best for free deployment)
This project’s Hugging Face Space downloads the model from the Hub at runtime using hf_hub_download(...).
Install and login:
pip install -U huggingface_hub
huggingface-cli login
Clone your HF model repo:
git clone https://huggingface.co/mdislammazharul/Lung_Cancer_Detection
cd Lung_Cancer_Detection
Copy artifacts in:
cp /path/to/lung_cnn.h5 .
cp /path/to/classes.json .
Commit + push:
git add .
git commit -m "Upload trained model + classes mapping"
git push
7) Phase 6 — Deploy inference on Hugging Face Spaces (Gradio)
After the model artifacts were hosted, I deployed a free public inference app using Gradio.
The Space app (Lung_Cancer_Detection_HF_Space/app.py) does this:
- Forces CPU inference
- Downloads model +
classes.jsonfrom HF Hub - Loads the model with a compatibility patch (
DenseCompat) - Runs preprocessing (OpenCV resize, normalize)
- Returns JSON probabilities +
predicted_class
Space deployment steps
- Create a new Space on Hugging Face (Gradio)
- Upload/push the contents of:
Lung_Cancer_Detection_HF_Space/
  app.py
  requirements.txt
Now the model is usable publicly without shipping the >100MB file inside the Space repo.
8) Phase 7 — Connect via Gradio API (frontend-independent testing)
Before building the React UI, I confirmed I could call the Space programmatically.
pip install gradio_client
from gradio_client import Client

client = Client("mdislammazharul/lung-cancer-detection-hf-space")
result = client.predict("data/sample_requests/example.png", fn_index=2)
print(result)
9) Phase 8 — Build the React frontend
Only after inference was stable (FastAPI + Space), I started to build the UI.
Frontend structure:
frontend/(Vite + React)- Tailwind styling
- Components like
ModelArchitecture.jsx,ModelPerformance.jsx,PredictionResult.jsx - API client:
frontend/src/lungSpaceApi.js(can target local FastAPI or HF Space)
Run locally:
cd frontend
npm ci
npm run dev
At this stage I could:
- upload an image
- get predictions
- show metrics and model details on the same site
10) Phase 9 — CI/CD with GitHub Actions
After everything worked locally, I automated:
A) CI: backend import smoke test
The ci.yml checks that the backend imports cleanly:
python -c "from backend.main import app; print('FastAPI import OK')"
This is a lightweight sanity check that catches broken imports early.
B) Deploy frontend to GitHub Pages
The pages.yml builds the frontend and deploys it to Pages. It also runs a backend import test with SKIP_MODEL_LOAD=1 so the workflow doesn’t require model artifacts during the Pages build step.
Summary
This project demonstrates the full lifecycle of a medical imaging application, starting from dataset preparation and CNN model training and progressing through inference validation, large-model artifact handling, deployment on free cloud infrastructure, containerization, frontend development, and automated CI/CD.
- Dataset folder structure
- Train model → save
artifacts/models/v1/* - Evaluate → save report
- FastAPI inference locally + curl tests
- Dockerize FastAPI → test container locally
- Push Docker image to Docker Hub
- Upload large model to HF Hub (or Git LFS)
- Deploy HF Space (Gradio) that downloads model at runtime
- Test Gradio API programmatically
- Build React frontend
- Add CI/CD (CI + Pages deploy)
Github: https://github.com/mdislammazharul/Lung_Cancer_Detection
Live Site: https://mdislammazharul.github.io/Lung_Cancer_Detection/